Ajouter un column mapping
La première fois que vous poussez des données vers un nouveau projet, vous devez définir :
- La structure du fichier (File Structure) que vous souhaitez téléverser (si votre fichier est au format CSV ou XLS, s'il contient un en-tête, le format du fichier, le caractère de séparation...)(documentation sur la structure du fichier)
- Le column mapping (quelle colonne est votre CaseID, activité, horodatage...)(documentation du column mapping)
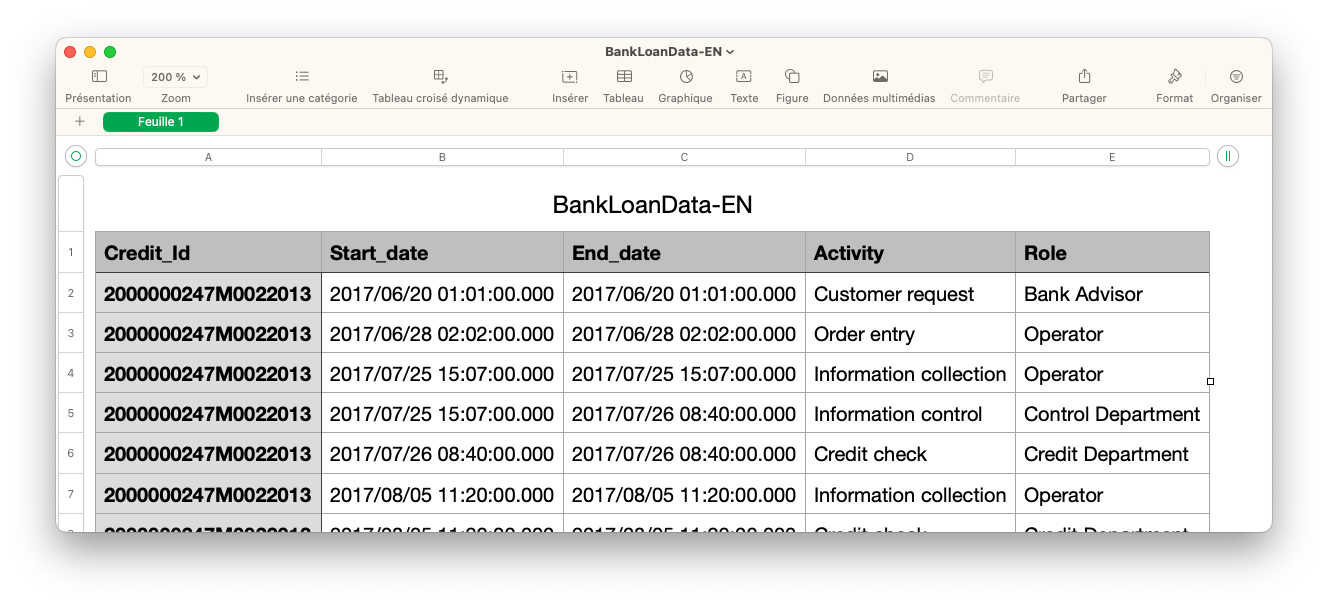
Le fichier BankLoanData-EN.csv est un fichier CSV qui contient plusieurs colonnes qui doivent être mappées à l'aide d'un column mapping.
La structure du fichier et le column mapping doivent être définis sous forme de JSON :
{
"fileStructure":{
"charset":"UTF-8",
"delimiter":";",
"quoteChar":"\"",
"eolChar":"\\n",
"header":true,
"commentChar":"#",
"fileType":"csv"
},
"columnMapping":{
"caseIdMapping":{
"columnIndex":0
},
"activityMapping":{
"columnIndex":3
},
"timeMappings":[
{
"columnIndex":1,
"format":"yyyy/MM/dd HH:mm/ss.SSS"
},
{
"columnIndex":2,
"format":"yyyy/MM/dd HH:mm/ss.SSS"
}
],
"dimensionsMappings":[
{
"name":"Role",
"columnIndex":4,
"isCaseScope":false,
"caseAggregation":"DISTINCT"
}
]
}
}
Pour ajouter un column mapping, la syntaxe est différente en fonction de si vous utilisez un terminal Linux ou Windows. La commande doit être formatée différemment selon le système, car Windows utilise une syntaxe différente pour certaines commandes. Les guillemets simples doivent être remplacés et un antislash doit être ajouté devant chaque guillemet double.
Pour Linux:
curl -X POST "<Your API URL>/pub/project/<Your Project ID>/column-mapping" -H "accept: /" -H "Authorization: Bearer <Your generated Token>" -H "Content-Type: application/json" -d '{"fileStructure":{"charset":"UTF-8","delimiter":";","quoteChar":"\"","escapeChar":"\\","eolChar":"\\n","header":true,"commentChar":"#","fileType":"csv"},"columnMapping":{"caseIdMapping":{"columnIndex":0},"activityMapping":{"columnIndex":3},"timeMappings":[{"columnIndex":1,"format":"yyyy/MM/dd HH:mm:ss.SSS"},{"columnIndex":2,"format":"yyyy/MM/dd HH:mm:ss.SSS"}],"dimensionsMappings":[{"name":"Role","columnIndex":4,"isCaseScope":false,"caseAggregation":"DISTINCT"}]}}' -v
Si la commande fonctionne, elle renverra un code HTTP 204.
Pour Windows:
curl -X POST "<Your API URL>/pub/project/<Your Project ID>/column-mapping" -H "accept: /" -H "Authorization: Bearer <Your generated Token>" -H "Content-Type: application/json" -d "{\"fileStructure\":{\"charset\":\"UTF-8\",\"delimiter\":\";\",\"quoteChar\":\"\\\"\",\"escapeChar\":\"\\\\\",\"eolChar\":\"\\n\",\"header\":true,\"commentChar\":\"#\",\"fileType\":\"csv\"},\"columnMapping\":{\"caseIdMapping\":{\"columnIndex\":0},\"activityMapping\":{\"columnIndex\":3},\"timeMappings\":[{\"columnIndex\":1,\"format\":\"yyyy/MM/dd HH:mm:ss.SSS\"},{\"columnIndex\":2,\"format\":\"yyyy/MM/dd HH:mm:ss.SSS\"}],\"dimensionsMappings\":[{\"name\":\"Role\",\"columnIndex\":4,\"isCaseScope\":false,\"caseAggregation\":\"DISTINCT\"}]}}" -v
Si la commande fonctionne, elle renverra également un code HTTP 204.
Si le code est 500, cela signifie qu'il existe déjà un column mapping.
Vérification de l'existence du column mapping
Après avoir ajouté un column mapping, nous pouvons vérifier s'il existe, pour nous assurer qu'il a bien été ajouté.
curl -X GET "<Your API URL>/pub/project/<Your Project ID>/column-mapping-exists" -H "accept: /" -H "Authorization: Bearer <Your generated Token>" -H "Content-Type: application/json"
Si la requête est réussie et que le column mapping existe, la commande renverra la ligne suivante :
{"exists":true}